Adding Custom Claims with Okta Token Inline Hooks
Sometimes you need to extend the default behavior of Okta during authentication, particularly when issuing OAuth 2.0 or OpenID Connect tokens.
Okta provides Inline Hooks, which allow you to invoke an external service at specific points in an authentication flow and dynamically modify the outcome.
This article demonstrates how to use a Token Inline Hook to add a custom claim to an ID Token. In the below flow sequence, the request is originated from a a Spring Boot application acting as an OIDC client.
Spring Boot Client
        │
        ▼
      Okta
        │
        ▼
Token Inline Hook
        │
        ▼
 Node.js (Express)
        │
        ▼
Returns commands
        │
        ▼
Okta issues ID Token
(with custom claim)
Note: Token Inline Hooks are supported only with Custom Authorization Servers.
Inline Hooks are:
- Synchronous (executed during authentication)
- Hosted externally
- Latency-sensitive, so your endpoint should respond quickly
Implementation Requirements
You’ll need the following:
- An Okta OIDC application
- A client application (Spring Boot in this example)
- A publicly accessible HTTPS endpoint
- A Token Inline Hook
- A Custom Authorization Server
Step 1 – Create an OIDC Application
Navigate to:
Applications → Applications → Create App Integration → OIDCChoose Web Application and configure:
- Redirect URI
- Client ID
- Client Secret
In this article, a Spring Boot OAuth 2.0 client is used.
Ensure the issuer matches your Custom Authorization Server.
Example:
https://your-okta-domain/oauth2/defaultStep 2 – Create a Public Endpoint
Since Okta invokes your endpoint, it must be publicly accessible.
For local development, ngrok is a convenient option.
Install ngrok:
choco install ngrokAuthenticate ngrok:
ngrok config add-authtoken YOUR_TOKEN_HEREStep 3 – Implement the Inline Hook
The following Node.js application uses Express.
const express = require('express');

const app = express();

app.use(express.json());

app.post('/okta-hook', (req, res) => {

  const authHeader = req.headers['authorization'];

  if (authHeader !== 'my-secret') {
    return res.status(401).json({ error: 'Unauthorized' });
  }

  console.log(JSON.stringify(req.body, null, 2));

  res.json({
    commands: [
      {
        type: "com.okta.identity.patch",
        value: [
          {
            op: "add",
            path: "/claims/custom-claim",
            value: "hello-from-hook"
          }
        ]
      }
    ]
  });
});

app.listen(3000);
The hook does not modify the token directly.
Instead, it returns a set of commands that Okta executes before issuing the token.
In this example, the com.okta.identity.patch command instructs Okta to add a new claim named custom-claim.
Run the application
node app.jsExpose it using ngrok.
ngrok http 3000Example:
https://xyz123.ngrok-free.appConfigure the hook URL as:
https://xyz123.ngrok-free.app/okta-hookStep 4 – Configure the Token Inline Hook
Navigate to:
Workflow → Inline Hooks → TokenConfigure:
- Name
- URL
- Authentication Type: Header
- Header Value:
my-secret
The configured secret should match the value expected by your Node.js application.
Step 5 – Create a Custom Authorization Server
Navigate to:
Security → API → Authorization ServersCreate a new Authorization Server if required.
Example issuer:
https://your-okta-domain/oauth2/defaultStep 6 – Configure an Access Policy
This step is essential.
Without an Access Policy, the Inline Hook will never execute.
Create a policy that:
- Applies to your OIDC application
- Uses the Authorization Code grant
- Includes the required scopes
- References your Token Inline Hook
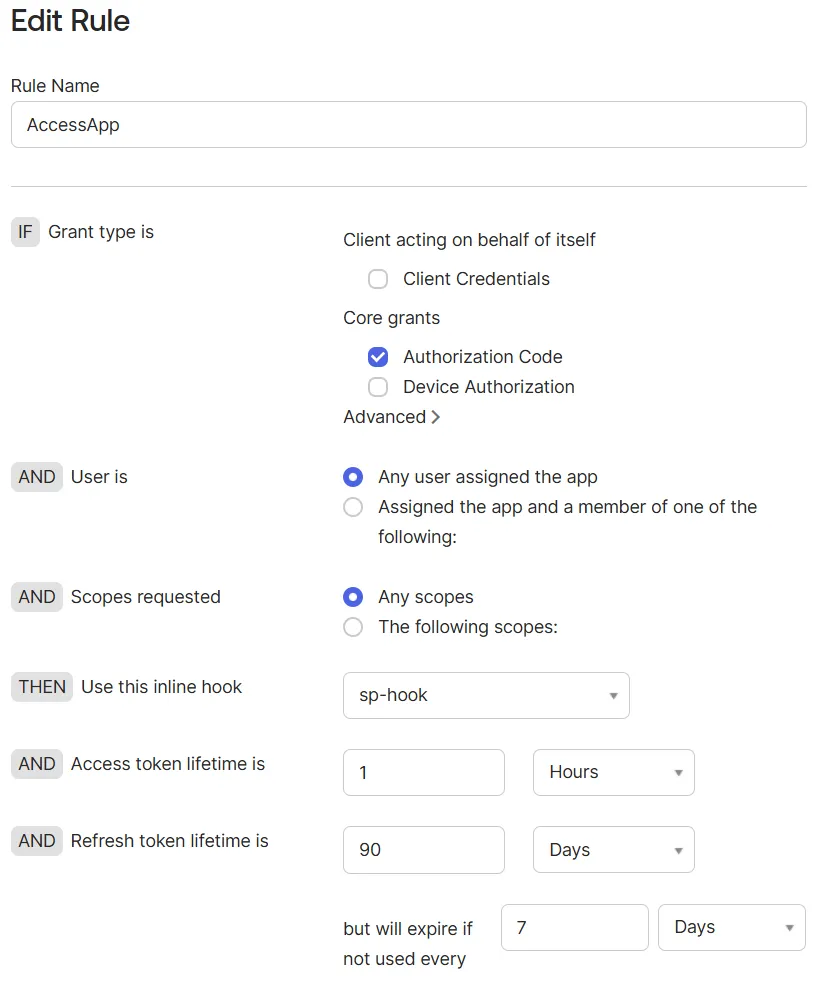
Screenshot: Access Policy Rule with Token Inline Hook selected.
Step 7 – Test
- Start the Node.js application.
- Start ngrok.
- Run your client application.
- Authenticate through Okta.
During authentication:
- Okta invokes the Inline Hook.
- The Node.js service returns the patch command.
- Okta adds the custom claim.
- The ID Token is issued.
Expected claim:
{
  "custom-claim": "hello-from-hook"
}
Verification
You can verify the implementation by:
- Decoding the token using jwt.io
- Viewing Inline Hook Metrics in the Okta Admin Console
Best Practices
- Use Token Inline Hooks only when dynamic processing is required.
- Keep the external service lightweight and responsive.
- Protect the endpoint using appropriate authentication.
- Minimize latency because the hook executes synchronously.
- Handle failures gracefully.
Summary
Token Inline Hooks provide a flexible mechanism for enriching OAuth 2.0 and OpenID Connect tokens without modifying the Okta user schema.
Common use cases include:
- Adding custom claims
- Transforming attributes
- Retrieving data from external systems
- Conditional claim injection
- Integrating enterprise applications during authentication
They provide an elegant way to extend token generation while keeping identity data centralized and your applications loosely coupled.