
Getting Started with Auth0 Automation Using Terraform
Introduction
Managing identity infrastructure manually through the Auth0 Dashboard works well for small environments, but it becomes increasingly difficult as applications and environments grow.
Modern DevOps practices emphasize automation, version control, and repeatability. This is where Infrastructure as Code (IaC) becomes valuable.
Although Auth0 resources are technically configuration rather than infrastructure, managing them using Terraform is widely considered an Infrastructure as Code practice because the same principles apply—configurations become version-controlled, repeatable, and suitable for CI/CD pipelines.
In this article, we’ll learn how to automate Auth0 configuration using the Auth0 Terraform Provider by creating an OIDC application.
What is Terraform?
Terraform is an open-source Infrastructure as Code (IaC) tool developed by HashiCorp.
It enables you to define, provision, and manage infrastructure and SaaS resources using a declarative language called HashiCorp Configuration Language (HCL).
Using the Auth0 Terraform Provider, many of the configurations normally performed through the Auth0 Dashboard can instead be managed as code through the Auth0 Management API.
This approach provides several benefits:
- Consistent deployments across Development, QA, and Production
- Version-controlled identity configuration
- Reduced manual errors
- Easier collaboration among teams
- Automation through CI/CD pipelines
Overview
Terraform requires permission to manage resources in your Auth0 tenant.
This is achieved by creating a Machine-to-Machine (M2M) application that is authorized to access the Auth0 Management API.
The overall process is:
- Create an M2M Application.
- Authorize it to use the Auth0 Management API.
- Assign the required Management API permissions.
- Use its credentials from Terraform.
You’ll need the following values:
- Auth0 Domain
- Client ID
- Client Secret
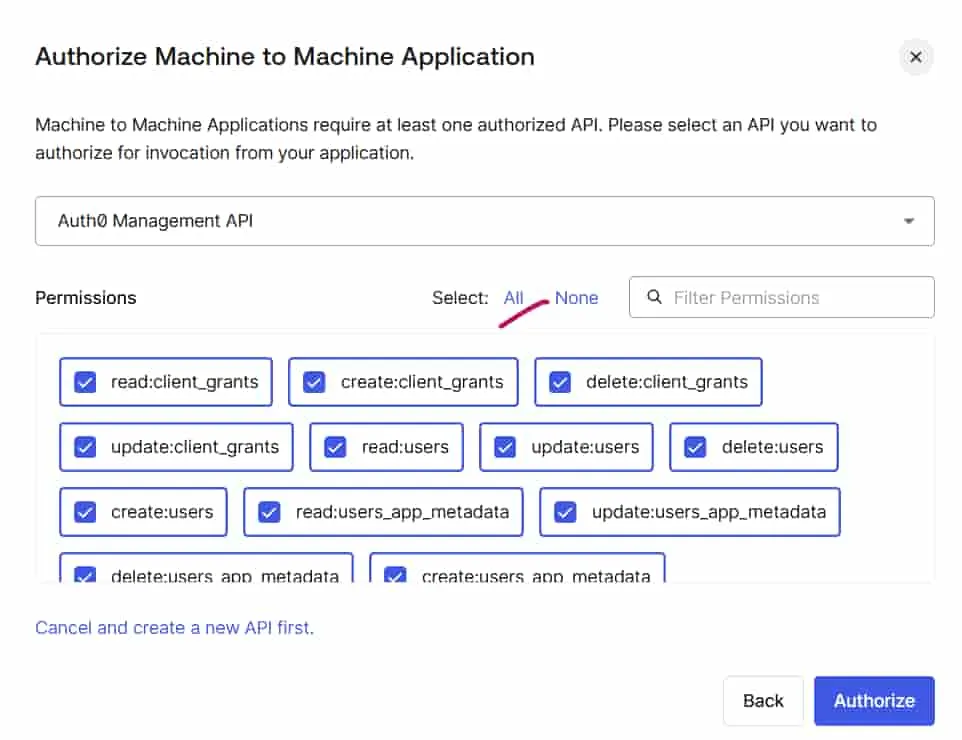
For learning purposes, granting broad permissions is acceptable. In production environments, always follow the Principle of Least Privilege by assigning only the permissions required.
Implementation
In this example, we’ll create a simple OIDC Regular Web Application using Terraform.
Step 1 – Configure the Provider
First, configure the Auth0 provider.
providers.tf
terraform {

  required_providers {

    auth0 = {
      source  = "auth0/auth0"
      version = ">= 1.0.0"
    }

  }

}

provider "auth0" {}
Step 2 – Define Variables
variables.tf
variable "auth0_domain" {}

variable "auth0_client_id" {}

variable "auth0_client_secret" {
  sensitive = true
}
Step 3 – Configure Environment Variables
Instead of storing secrets in Terraform files, define them as environment variables.
Linux/macOS
export TF_VAR_auth0_domain="your-domain"

export TF_VAR_auth0_client_id="your-client-id"

export TF_VAR_auth0_client_secret="your-client-secret"
Windows PowerShell
$env:TF_VAR_auth0_domain="your-domain"

$env:TF_VAR_auth0_client_id="your-client-id"

$env:TF_VAR_auth0_client_secret="your-client-secret"
Step 4 – Initialize Terraform
terraform initTerraform downloads the Auth0 Provider and prepares the working directory.
Step 5 – Create an OIDC Application
Append the following resource to main.tf.
resource "auth0_client" "auto_client" {

  name            = "AutoApp"

  description     = "AutoApp created through Terraform"

  app_type        = "regular_web"

  callbacks       = [
    "http://localhost:3000/callback"
  ]

  oidc_conformant = true

  jwt_configuration {

    alg = "RS256"

  }

}
Step 6 – Preview the Changes
terraform planTerraform compares the desired configuration with the current state of your Auth0 tenant and displays the changes that will be made.
Step 7 – Apply the Configuration
terraform applyAfter confirmation, Terraform creates the application in your Auth0 tenant.
You can verify the new Regular Web Application from the Auth0 Dashboard.
Understanding Terraform State
Terraform maintains a state file named:
terraform.tfstateThis file acts as Terraform’s source of truth.
It contains:
- Resource mappings
- Resource metadata
- Current infrastructure state
- Occasionally sensitive values
Never commit terraform.tfstate to Git. In production, use a secure remote backend such as Terraform Cloud, AWS S3, or Azure Storage.
Resource vs Data Source
Terraform distinguishes between two important concepts.
Resource
A Resource creates and manages infrastructure.
Example:
resource "auth0_client" ...Data Source
A Data Source reads existing infrastructure without creating or modifying it.
Example use cases include:
- Reading an existing connection
- Reading an existing client
- Referencing an existing organization
Data sources are useful when integrating Terraform with pre-existing Auth0 environments.
Detecting Configuration Drift
Suppose someone manually changes the Auth0 application through the Dashboard after it has been created using Terraform.
This situation is known as configuration drift.
Run:
terraform planTerraform compares:
- Desired state (Terraform configuration)
- Actual state (Auth0 tenant)
and reports any differences.
If you later execute:
terraform applyTerraform attempts to bring the environment back to the state defined in your configuration.
For this reason, it’s considered a best practice to treat Terraform as the single source of truth and avoid manual configuration changes.
Using Terraform in CI/CD Pipelines
Terraform is commonly executed from CI/CD platforms such as GitHub Actions.
Sensitive values should never be hardcoded.
Instead, store them securely using:
- GitHub Secrets
- HashiCorp Vault
- AWS Secrets Manager
- Azure Key Vault
Example GitHub Actions configuration:
env:
  AUTH0_DOMAIN: ${{ secrets.AUTH0_DOMAIN }}
  AUTH0_CLIENT_ID: ${{ secrets.AUTH0_CLIENT_ID }}
  AUTH0_CLIENT_SECRET: ${{ secrets.AUTH0_CLIENT_SECRET }}
Benefits include:
- No secrets in source code
- Secure deployments
- Auditable automation
- Consistent deployments across environments
Best Practices
- Store Terraform code in version control.
- Keep secrets outside the repository.
- Use remote backends for state management.
- Follow the Principle of Least Privilege.
- Promote the same Terraform configuration across Development, QA, and Production environments.
- Treat Terraform as the single source of truth.
Related Articles
After learning the basics of the Auth0 Terraform Provider, you may also be interested in:
- Enterprise IAM Provisioning with Auth0, Terraform, Vault and MinIO
- Automating Auth0 Actions and Triggers with Terraform
- Customizing Auth0 with Actions and Triggers
- Multi-Tenancy Using Organizations in Auth0
Conclusion
Terraform provides a reliable and scalable way to manage Auth0 configuration using Infrastructure as Code.
As identity platforms grow, managing configuration through code helps:
- Reduce manual errors
- Improve consistency
- Simplify collaboration
- Enable CI/CD automation
- Scale identity management across environments
For organizations adopting DevOps practices, Terraform is an excellent choice for managing Auth0 resources in a repeatable, secure, and maintainable manner.